Textpattern Review
Textpattern has often been heralded as one of the most flexible open source CMS available. With it's small footprint and straight forward interface, it's also a favorite of designers and developers around the world. Today, we're going to take a look at Textpattern and what makes it so agile in this Textpattern review.
To start off with, the typical size (of this writing) of the Textpattern download is approximately half a meg. This is incredibly small for a CMS with such power and flexibility. Installation is pretty standard and there's not much to really show there that isn't typical to most CMS. You'll get prompted to enter your database credentials, create a config file and enter user details.
Once complete, you'll be taken to the login screen for the back end. Enter your credentials to log in and you'll see the Textpattern dashboard:
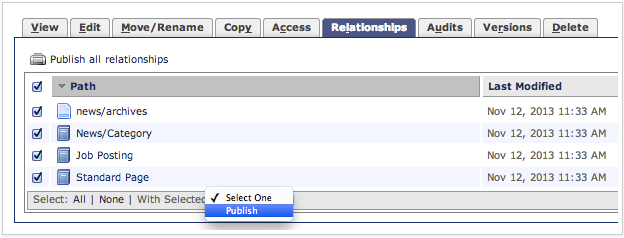
Note that the CMS defaults to the Write tab. This is due to the fact that this is likely the first thing most people will want to do when logging in. A simple but smart decision by the Textpattern development team. You may also note that there are no typical post buttons for bold, italics and the like. That's because by default, Textpattern uses textile syntax for formatting.
For those use to Wysiwyg (what you see is what you get) editors, this may be a bit of a shock. Textile is a very easy to use syntax and personally, I prefer it. You can see more about what textile syntax looks like here: Textile Syntax. Once you've used it, you may begin to prefer it over standard HTML.
Textpattern is all about flexibility, however, so should you prefer to use a Wysiwyg editor, you can simply install a plugin to do so.
For testing purposes and to show how the plugin installation process works, let's go ahead and install a plugin to add a new editor to the system.
First, you would search for the appropriate plugin on the Textpattern Resources site. For this test, we'll use the hak_tinymce plugin.
Once downloaded and extracted, you will see three files:
The plugin itself is a simple txt file. This is standard for all Textpattern plugins and, as you'll soon see, one of the reasons why plugin installation is so easy to do for anyone. For this plugin, we need to upload the tiny_mce folder to our /textpattern directory on our web host, so we'll go ahead and do that.
Once we've uploaded the tiny_mce folder, we simply open the hak_tinymce.txt file in your favorite text editor and copy the contents. Then navigate to your Admin – Plugins tab in Textpattern and you'll see a box like this:
 Simply paste the contents of the hak_tinymce.txt file in this box and click upload. You'll be shown a plugin preview page that looks like this:
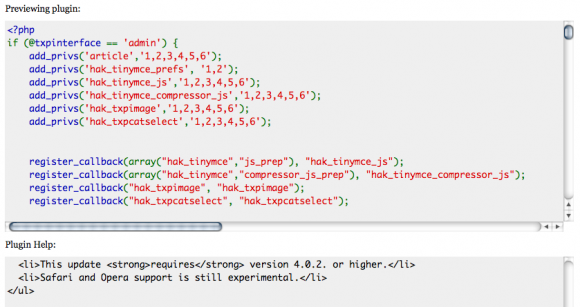
Simply scroll down and underneath the Plugin Help: section, you'll see an Install button. Clicking on this will install the plugin. Now, as per instructions in the plugin zip file, you need to initialize the plugin. Navigate to Extensions, hak_tinymce and click the install button (Note that this process is usually not required for most plugin installs and is exclusive to this particular plugin. Most of the time, this step is not present / required at all.)
Once you click install, you'll be given a list of options to choose from for the editor. You can either modify these settings or ignore them and click update.
Head back to Admin/Plugins and you'll now see the plugin listed in the screen below:
 To enable, simply click on the “No” under active.
Head back to Content, Write and on the left, you'll see a new toggle:
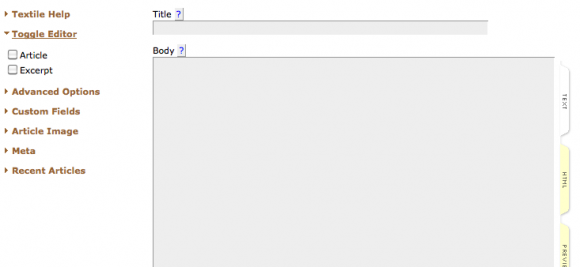
Place a checkmark in the Article box to turn on the editor. The result:
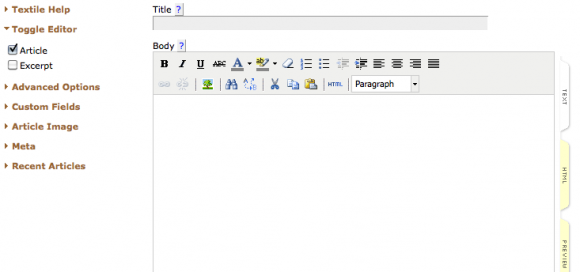
That's it. You now have a Wysiwyg editor.
As I mentioned during this process, the typical plugin install does not require anything to be actually uploaded, nor does it require navigating to the Extensions tab. Most of the time, you simply paste the text file contents in the plugin box and click install, then activate it and you are done.
Let's take a look at some more pieces of the admin interface, shall we?
There are two levels of tabs available. The top level represents the main tabs, while the bottom level represents sub tabs. For example, clicking on the Content tab at the top enables the following sub tabs (Category, Write, Articles, etc):
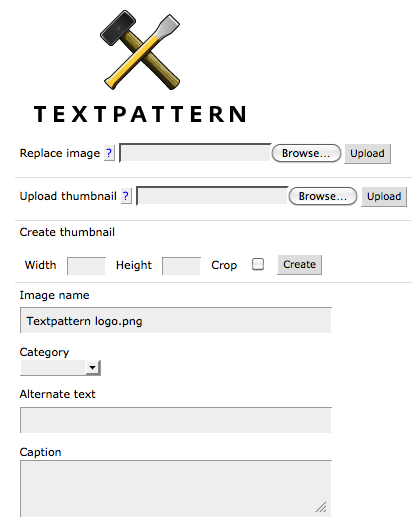
These are all quite straight forward. Let's take a look at the Images tab. Uploading images is simple, just select and upload. Once it's been uploaded, you'll be given the opportunity to crop into a thumbnail, add to a category and modify the alt text as required.
 Now let's take a look at the Presentation tab. Under here, you can modify your Sections, Pages, Forms and Styles. In the Sections tab, you have the opportunity to assign templates and styles to individual sections. For instance, the Articles section uses a different template and style sheet than the the About section (more about sections here).

As you can see, you can also determine where sections are shown and whether or not they are included in the site search. The Pages tab is next. This is where you can create and modify the templates for each page.
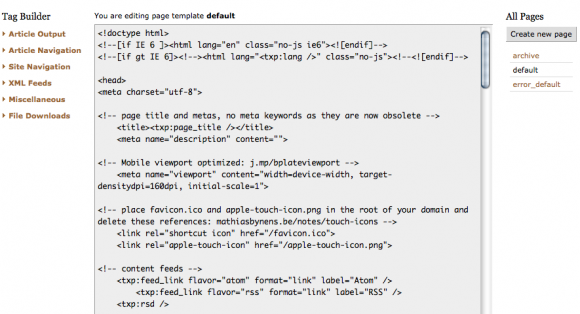
A very cool feature of the Pages tab is the Tag builder (shown on the left of the screenshot above). This allows you to make selections form the list on the left and it will show you which code to insert into the template to accomplish that task. This is a great feature to help you get familiar with the system.
Next are Forms.
This is one of Textpattern's key strengths. Using forms, you can separate your code into reusable chunks (more about forms here).
On this install, for instance, I've created a form which contains nothing more than my Piwik analytics code from my Statistics system.

Now, I simply call the form in my Page template wherever I wish using this code:
<txp:output_form form="analytics" />
It's as simple as that. Now, should I need to include this analytics code on multiple pages or in more than one place, I can do so with the code above. The advantage to this style of coding is that if I need to change the code for whatever reason in the future, I simply change the code in the form as opposed to having to edit each template in multiple places. Developers love this feature, for obvious reasons.
The styles tab provides an interface to edit the stylesheets or create new ones as needed.
Under the admin section, the following sub tabs exist:
 Clicking on the Diagnostics tab will run a quick series of tests and provide you with either an “Al l checks passed” message, or give you some suggestions.
The Preferences tab provides you with access to the settings of the CMS.
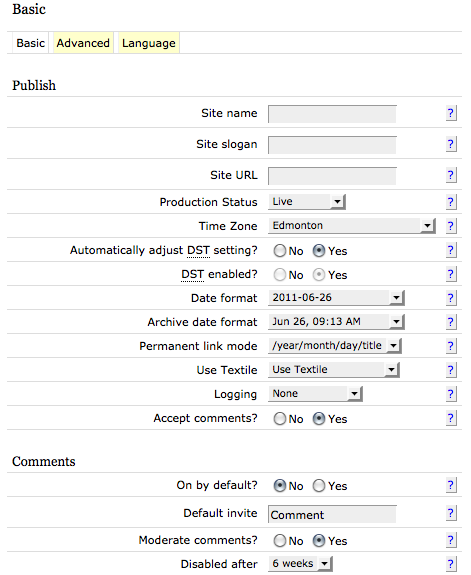
To manage users, simply head to the Users tab. Here, you can modify privileges and details for your users. On the Visitors log tab, you can see all of the latest visitors to your site if you have logging enabled. For the most part, it's better to use an Analytics program such as Piwik or Google Analytics.
We've already seen the Plugins section, so we'll skip over that. On the Import tab, you can choose to import content from a variety of other systems and CMS.
That, ladies and gentleman, covers pretty much the entire Admin interface for Textpattern. From a usage standpoint, there's definitely a bit of a learning curve to get used to the way that Textpattern handles itself, but once you do, you'll discover the true power of this system.
For me, what draws me to use it is the minimalist nature of the CMS. I love the speed of the interface (it's lightning fast compared to other CMS such as WordPress) and I find Textile for article writing to be intuitive and produce cleaner content.
There is an active community and plenty of plugins to accomplish pretty much anything you might need. If you are looking for a system that's powerful, fast and has plenty of options, Textpattern is a great choice. If you are a developer, it's even better given the flexibility of the forms system. I highly recommend checking out Textpattern.
Website: Textpattern