Creating a Simple MailChimp Newsletter Signup Form for Foundation 5 Framework

I had a hard time finding good articles that guide you through this process so to help save anyone who may be looking to use the awesome Foundation Framework from Zurb and need to create a super simple MailChimp signup or subscription form with it, I thought I'd share the process.
This process will work with almost any newsletter provider including Aweber but for the sake of this tutorial, I'm only going to show you how to do it with Mailchimp since that happens to be what I use for our sites.
To get started, determine where you are going to place your signup form within your website. As you know, with Foundation, using the grid system, it's very easy to scale content to fit into almost anywhere. For the purposes of this tutorial, you'll want enough space to allow the form fields to be wide enough. If you look at the bottom of this very article, you'll see an implementation of the exact form I'm going to teach you how to make.
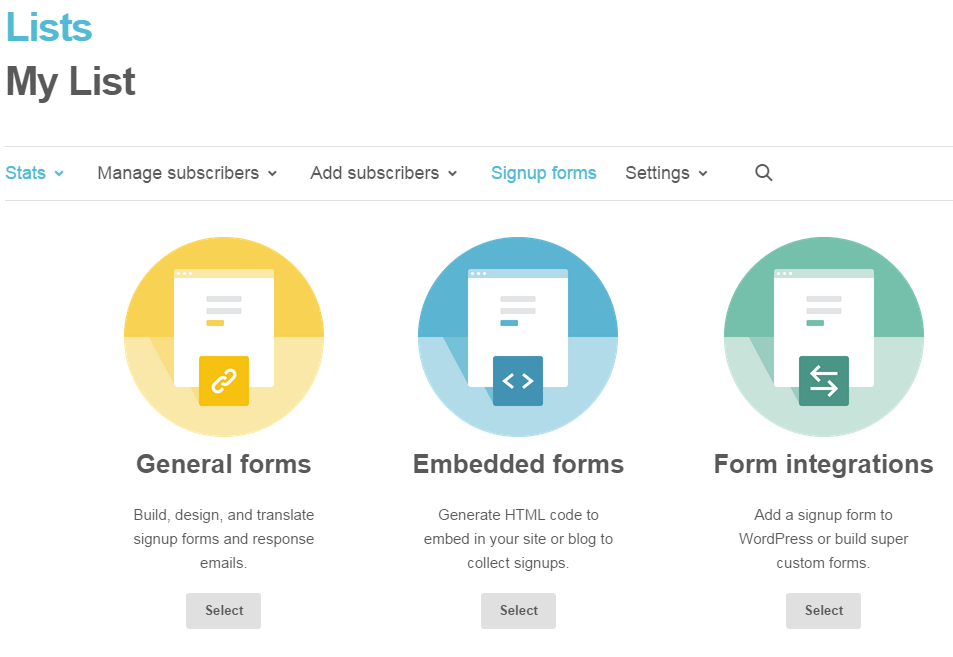
First, log into your Mailchimp account and go to your list. Click the dropdown beside Stats and choose Signup Forms

Now you'll see this screen, click Embedded Forms.

Now click on the tab labeled Naked and copy the code from the Copy/Paste Onto Your Site section. It should look like this:
<!– Begin MailChimp Signup Form –>
<div id=”mc_embed_signup”>
<form action=” //myawesomewebsite.us8.list-manage.com/subscribe/post?u=a1b2c3d4ef5g67891hij1234&id=a123b45cd6 ” method=”post” id=”mc-embedded-subscribe-form” name=”mc-embedded-subscribe-form” class=”validate” target=”_blank” novalidate>
<h2>Subscribe to our mailing list</h2>
<div class=”indicates-required”><span class=”asterisk”>*</span> indicates required</div>
<div class=”mc-field-group”>
<label for=”mce-EMAIL”>Email Address <span class=”asterisk”>*</span>
</label>
<input type=”email” value=”” name=”EMAIL” class=”required email” id=”mce-EMAIL”>
</div>
<div class=”mc-field-group”>
<label for=”mce-FNAME”>First Name </label>
<input type=”text” value=”” name=”FNAME” class=”” id=”mce-FNAME”>
</div>
<div class=”mc-field-group”>
<label for=”mce-LNAME”>Last Name </label>
<input type=”text” value=”” name=”LNAME” class=”” id=”mce-LNAME”>
</div>
<div id=”mce-responses” class=”clear”>
<div class=”response” id=”mce-error-response” style=”display:none”></div>
<div class=”response” id=”mce-success-response” style=”display:none”></div>
</div> <!– real people should not fill this in and expect good things – do not remove this or risk form bot signups–>
<div style=”position: absolute; left: -5000px;”><input type=”text” name=”b_d6c7b9e3bb5b63272adf08873_b544c97fe8″ tabindex=”-1″ value=””></div>
<div class=”clear”><input type=”submit” value=”Subscribe” name=”subscribe” id=”mc-embedded-subscribe” class=”button”></div>
</form>
</div> <!–End mc_embed_signup–>
The only piece of this code you'll need is the form action piece, which I've made bold in the above code. Copy this and put it into notepad or something similar.
Now to create your form, simply take the following code and insert your copied form action as shown below:
<h5>Get free exclusive content and contests in our weekly email!</h5>
<div id=”mailchimp_form”>
<div class=”row signup”>
<div class=”small 12 columns end”>
<form action=” //myawesomewebsite.us8.list-manage.com/subscribe/post?u=a1b2c3d4ef5g67891hij1234&id=a123b45cd6 ” method=”post” id=”mc-embedded-subscribe-form” name=”mc-embedded-subscribe-form” class=”validate” target=”_blank” novalidate>
<div class=”row panel radius”>
<div class=”medium-4 columns”>
<label for=”mce-FNAME” class=”mce-labels”>First Name</label>
<input type=”text” value=”” name=”FNAME” class=”required radius” id=”mce-FNAME” placeholder=”First Name” required pattern=”[a-zA-Z]+”>
</div>
<div class=”medium-5 columns”>
<label for=”mce-EMAIL” class=”mce-labels”>Email Address</label>
<input type=”email” value=”” name=”EMAIL” class=”required email radius” id=”mce-EMAIL” placeholder=”Email” required>
</div>
<div class=”medium-3 columns”>
<label for=”mc-embedded-subscribe” class=”mce-labels”>Subscribe</label>
<input type=”submit” value=”Yes, please!” name=”subscribe” id=”mc-embedded-subscribe” class=”button tiny radius signup-btn”>
</div>
<div id=”mce-responses” class=”clear”>
<div class=”response” id=”mce-error-response” style=”display:none”></div>
<div class=”response” id=”mce-success-response” style=”display:none”></div>
</div>
<div style=”position: absolute; left: -5000px;”>
<input type=”text” name=”mailchimp-number” tabindex=”-1″ value=””>
</div>
</div> <!– /row panel radius inputs –>
</form>
</div>
</div> <!– / row signup –>
</div>
Place this code snippet where you want the form to appear and you are done. Of course, feel free to style as needed. Here's what your form will look like:

I hope you found this tutorial useful, if you did, please share. Thanks for reading.