How to Start a Food Blog
If you are looking to start a food blog and have no clue how to go about making that happen, this article may be for you. Today, I'm going to share with you the process I used to kick start my wife's successful food blog, The Kitchen Magpie. So, want to learn how to start a food blog? Let's begin.
It doesn't matter if you are looking to share recipes, restaurant reviews, or generally just want to spread your passion (and pictures) of the wonderful food you've eaten or enjoy.. you can do so with a food blog. You can even, with the right amount of effort and patience, make a living doing it if you so choose. I know because my wife does and we made that happen by applying the process below.
To start your food blog, you need to decide which method suits you best. You can either:
Hire a Designer and Developer. There's nothing wrong with going this route, just be prepared to spend a few thousand dollars for a quality design and to hire the developer to take that design and convert it into a well-coded food blog. A great place to find inexpensive designers and developers is Fiverr.
Build it yourself. My personal preference. I am a coder at heart so I prefer to learn by doing. When we first kicked off Karlynn's blog, I built it on WordPress using the method below and got it up and running. Once it became successful and she started getting crazy amounts of traffic and earning money from it, we then hired a designer and a WordPress development team to create a unique look for her site. Feel free to go check it out: The Kitchen Magpie .
How to Start a Food Blog: The Steps Involved
These are the steps I'm going to cover in detail, for those of you who can't wait to find out the process. I'll cover them in more detail as you read on.
- Come up with a name for your food blog and register it as a domain name.
Before you can start a food blog, you need to consider what your blog will be about. Will you be sharing recipes, posting pictures of food you've eaten, writing restaurant reviews? Once you know the general concept, you can start thinking of what name you want to use for your food blog. Then you'll need to register this name as a domain. - Find a website hosting company that offers a well-priced, affordable hosting package with excellent support.
I've written before about who I think are the best web hosts out there but I'll outline which ones are the best ones to use to get started with and then, once you have some decent numbers under your belt (visitors to your website that is), which option you should switch to. - Install WordPress
Yes, there are other options but realistically, WordPress is the best choice if you are looking for a food blog. There's no better option when it comes to building up solid SEO and getting ranking well in the search engines; both of which are critical to being successful. - Configure WordPress
I'll touch on a few minor settings changes you should make once you have it up and running. - Find and Install a WordPress Theme
While there are some decent free themes for WordPress out there, I'd recommend choosing a well-known WordPress theme developer and purchasing a premium theme. This way, you get support as well as regular updates. - Install and Configure WordPress Plugins
There are a few plugins that are absolute must haves when it comes to WordPress, I'll explain which ones you should be using as well as point you to a few food blog specific plugins you should be installing. - Other Services and Tools
Once you have WordPress running and configured, there are a few other tools you may wish to consider setting up and signing up for. I'll break them down for you and offer both free options and premium ones. You can then choose which suit your needs the most.
Step 1 – Decide on a Name an Register the Domain
This is perhaps the toughest part, coming up with a name. You want to make sure that the name you come up with fits what the food blog is about, so think carefully about what you plan to write about before you decide on a name.
You want something that is:
- Easy to remember.
- Catchy and fun.
- Won't be confused with another business or brand.
- Isn't too long.
- Describes your food blog.
If you've ever had a nick name or somebody has said something to you that sounded like a good idea, this might be a good place to start. Perhaps you are writing about desserts? Then maybe you should try to incorporate that into the name. Good food blogs have names that describe the personality of the author and the topic of the blog (or a blend of both). The Kitchen Magpie monicker that my wife goes by was a combination of her love to be in the kitchen and her desire to collect pretty, shiny things. We combined two things into the name and now it's a catchy name people remember.
Coming up with a name can be tough but once you've done so, you'll need to register it as a domain name. Contrary to what people say, and the opinions vary heavily on this, a .COM is the best domain name you can get and it's always the best option.
Once you have a list of potential ideas, you'll need to see if any of them are available for you to use.
Most of the time, a domain name will cost you between $10 to $15 per year but when you purchase a hosting package together with it, it's usually cheaper or free. I recommend somewhere inexpensive like GoDaddy for cheap hosting to get you started.
To do so, enter the potential domain name (complete with the .COM part) into the box below and check its availability. If it's available, it will let you register it immediately. If not, it'll tell you it's taken. Nice and simple.
If you prefer to register your domain separately, you can do so at Namecheap. They are one of the least expensive registrars and they offer easy to use domain management tools. Believe me, domains registered through other services tend to be difficult to configure and set up.
Step 2 – Find a web host for your food blog
If you've already registered your domain above, then this step is already complete and you've got this hosting package already. If you haven't, it's very important to make sure you select an affordable hosting package from a reputable hosting provider that offers excellent support. We've had plenty of experience with the good ones and the bad ones and when it comes to reliability and cost, I think GoDaddy likely is the better option.
GoDaddy is one of the largest and most popular web hosts out there. They offer a very reasonably priced hosting package and have a great support team that can help you resolve any issues you might have down the road. GoDaddy has a slick managed WordPress offering (which basically means the site is built quickly for you without having to install WordPress yourself.
I've had poor experiences with Hostgator and others in the past, so I'd personally recommend avoiding them at all costs.
Step 3 – Install WordPress
This is one of the reasons I recommended hosting through GoDaddy, to begin with. For those new to food blogs or blogging in general, installing an application (even one as simple as WordPress) can be a bit daunting. GoDaddy does this automatically if you buy their managed WordPress offering which is priced between $2 and $15 per month (which is crazy cheap).
If you are not on GoDaddy, installing WordPress is still pretty simple. Here's the official installation guide: Installing WordPress.
Step 4 – Configure WordPress
WordPress comes pre-configured to be pretty much ready to go minus a few simple things. The only real setting change you need to make is to change the permalinks. These determine how your posts will look on the web.
Follow these steps to change them from the default setting:
- Log into the WordPress Dashboard.
- Go to Settings -> Permalinks and select Post name.
- Click save
Once this is done, you are good to go.
Step 5 – Find and Install a WordPress Theme
The ideal WordPress theme should be:
- Responsive
Responsive themes are simply designed to work on every type of screen from your laptop or desktop all the way down to your smartphone. A proper responsive theme will make it easy for the reader to still read the content (without squinting) and access menus, etc no matter what device they are using. This is very important nowadays. You’d be surprised how many people will read your website on their phone or tablet! - Well Supported
Finding a WordPress theme is easy. Finding a WordPress theme with great support can be a challenge. There are all kinds of free ones out there but you will be out of luck if you need help unless you are willing to pay for it. I personally recommend going with one of the options I’m going to list below. This way, you’ll get an amazing theme that also offers great support and fits all of these requirements. - Beautifully Designed
It goes without saying that you want a theme for your food blog that not only matches the look and feel you want to achieve but that is also good looking, easy on the eyes and designed by a professional that knows their stuff. - Search Engine Optimized
It’s a bit of a daunting term but in a nutshell it means that the theme you are using has been coded so that search engines understand it and will rank your site well. You don’t want a theme with sloppy code because it will prevent you from achieving a good ranking on Google in comparison to one that is well coded. A cleanly designed theme can do wonders for your visibility on the web. - Easy to use
You are going to be the one using your theme the most so you might as well make sure its going to be easy for you to use and offers the features you want. Unless you understand code, you won’t want to have to mess around with it in order to achieve simple tasks. Choose a theme that comes with easy to configure options (changing colors, adding a logo, etc) in order to save yourself some headaches early on. - Updated regularly
With WordPress, there are regular security updates released. As a result, you’ll want to make sure the theme you choose is updated regularly (easiest way to do this is to go with a reputable theme firm like the ones I’ll outline below) in order to make sure it remains compatible with future updates of WordPress.
With Karlynn's website we use the amazing Genesis Framework and built a custom design on top of it. When we first started out, however, we used one of their many beautiful themes as a starting point. The thing with themes based on Genesis is that they are fast, well coded and Google loves them. All of these things are critical to a well performing food blog.
Any of their themes would be a great choice but if you want a really solid head start, try out one of these ones:
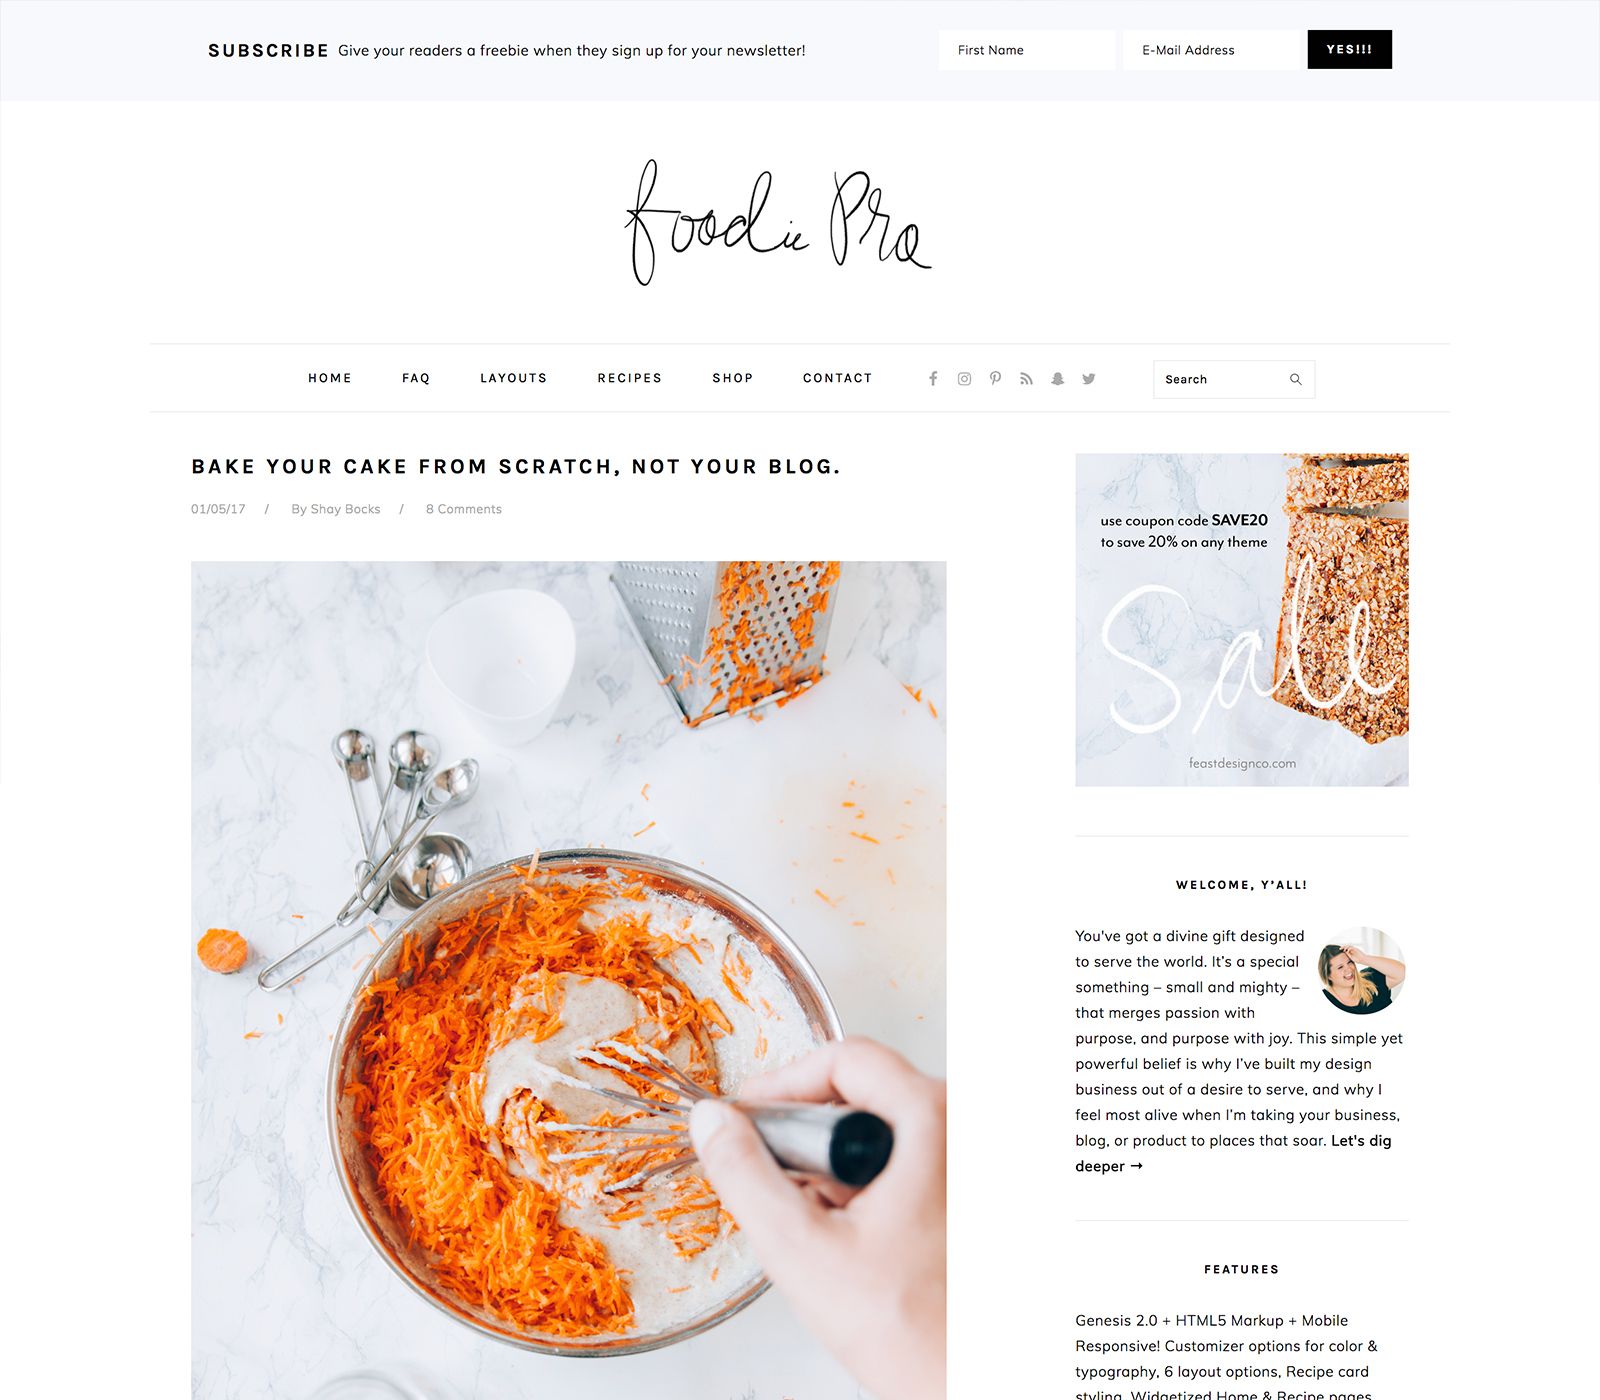
Foodie Pro
Foodie Pro is pretty much THE go-to for someone starting a food blog. It's very well designed and developed and contains everything you need to perform well on Google (while also being nice to look at). It showcases photography nicely which is also the key to a successful food blog.
If these don't work, you can always look through their other themes to see if one of their others fit your needs.
I'm also a big fan of Envato. It's one of the largest marketplaces for themes and plugins for WordPress so if you can't find something here, you aren't looking hard enough ;).
Step 6 – Recommended plugins for your Food Blog
There are four plugins that I recommend installing right away on your blog in order to maximize the value of your blog for your future readers. They are:
- AddThis. AddThis gives you buttons on your posts so people can share them on Facebook, Twitter, Pinterest and other social networks. It’s critical to have this capability and definitely a top notch plugin that you should install on any blog you have.
- Akismet. This is an important plugin to install. It helps prevent spam comments from appearing on your blog by blocking them entirely.
- WP Recipe Maker. WP Recipe Maker makes recipe entry a breeze. It’s quick. It’s easy. The recipes look great. Your recipes will have ratings and print features and most importantly you have a much better chance for your recipes showing up in Google’s Recipe View search results. It's also pretty much mandatory if you want to start a food blog. Without it, don't expect your site to do well.
- Yoast SEO. This is probably the most important plugin you can install. It automatically does all of the things you need in order to make your website show up in Google and other search engines in the best possible way. Take your time and go through the wizard to learn how to set it up and you’ll be well-positioned to succeed!
To install a plugin:
- Log into your WordPress dashboard
- Go to Plugins -> Add new
- Type the name of the plugin in the search box and hit enter
- Find the plugin and click Install now
- Once the plugin is installed, click Activate
( Read this how to article on installing plugins if you need help. Each of these plugins has a configuration setting that it will add to your dashboard. Some will show up under Settings and some may create new menu entries. Be sure to visit their settings and configure them to your needs. If you need help, use Google to find recommended settings or leave your questions in the comments here and I'll do my best to assist.
Step 7 – Other Services and Tools
To use most of the free services that Google has available, you’ll need a Google account and potentially, a Gmail account for your food blog. If you don’t have one, set one up here first: Set up a Gmail account.
Once you have done this, head to these places to log in and set up these free tools:
- Google Webmaster Tools: This free service will make sure your food blog isn’t down and alert you of any issues Google finds with it. This is critical for any blog or website. You can install the code it provides you within the settings for the WordPress SEO plugin I recommended above.
- Google Analytics: Google Analytics will provide you with statistics on who is visiting your blog, how many visitors you are getting and where they are coming from. It’s a free service and most websites use it for this reason so be sure to set it up.
Get Blogging!
Once you've followed all of these steps, you'll be ready to start blogging so get going and please let me know if you found this article helpful. If you did, please share it so others can find it too and leave a comment with any questions you may have. If you've used this article to help create a blog, let me know, I'd love to hear about it.